NEWS : The Weblog is BACK again with a new Team !

Choose your Language : English | Arabic | French | Italian | Russian | Spanish | German | Chinese

UPSOS Blog Feedback Survey :

Please complete this short survey to give us feedback on our blog :

http://spreadsheets.google.com/viewform?key=pHtdCqYlJfrHN3D6-lQHsbQ

Wednesday, December 31, 2008

How To Restore Firefox’s Lost Bookmarks

Did this ever happen to you that you opened Firefox and you found out that all your bookmarks are gone.

Well this sometimes happens when your Firefox is not closed properly and mostly due to that you lose all your bookmarks.

But many people don't know that Firefox make backup of your bookmarks everyday and there are some simple ways to restore the lost bookmarks in Firefox.

f this happened with you as well then don't worry because after the following steps, hopefully you will get all your bookmarks back.

The first thing your should do is locate your Firefox’s profile folder which is usually in :

C:\Documents and Settings\[USER-NAME]\Application Data\Mozilla\Firefox\Profiles\


Or if your cant find it, simply go to Start > Run and type the following command and it will take you to the Firefox profile folder

%APPDATA%\Mozilla\Firefox\Profiles\


Find this first and then in this folder, there will be a folder of bookmarkbackups as shown in the picture below :


Just Open the BookmarksBackup folder and there you will see many html files with dates given in there name as shown below :


There you go you found all of your bookmarks that were made by Firefox automatically.

Now Just copy the file you want to. What i mean is copy the latest file by checking the date and paste it somewhere or just paste in your desktop so that it is easy to locate when you want to restore the bookmarks you lost.

Now This is an easy task i-e restoring the backup.

Just Open your Firefox and go to Bookmarks> Organize Bookmarks.

A new window of bookmarks open and then go to File > Import > check From File


Locate the bookmarks file from the location where you pasted the file and Click Ok.

And hopefully all your bookmarks will be back.

We hope that this tip helps you !

Tuesday, December 30, 2008

How To Launch Quickly Websites With "SiteLauncher"

There are various add-ons or plugins to Firefox browser which allow users to have quick access or quick launch to their favorite or most visited websites.

The recently released tool, SiteLauncher, is another interesting quick launch tool that allows Firefox users to access their favorite website using some hotkeys with their keyboard.

SiteLauncher’s working concept is quite similar to Speed Dial, another quick launch tool to open pre-set websites.

However, unlike
Speed Dial, users do not need to use the mouse to click the Speed Dial tab to open the websites.

Users just need to press the default hotkey (customizable) Ctrl+Space (or Ctrl+Alt for Mac users) followed by a unique key to launch a site.

For instance, users can set G key for Gmail.
Pressing on to Ctrl+Space+G will launch the Gmail site immediately.
It is super quick to open the most frequently visited websites such as Google, Gmail, Twitter or UPSOS blog.

Other features of this interesting adds-on include:

  • No limit on how many sites can be added to SiteLauncher.Users can add any character key that can be associated with a site. They are not limited to just 0-9 and a-z.
  • Default hotkey is customizable, in case you need it for something else.
  • Highly customizable appearance - change colors, text size, spacing, column size, etc...
  • Optional visual effects - transparency, rounded corners, and gradients.
  • You can have your site shortcuts automatically arranged or manually arranged in the order you want them to appear inside the Launcher.
  • Set Launcher to open sites in current or new tab.
You need to Log-in to install this experimental add-on.

Saturday, December 27, 2008

Automatically Save Download Files From Firefox To Desired Location With Automatic Save Folder

Usually when one download a file from the Internet, web browser such as Firefox will prompt for location to save, or simply save to one default folder.It may take user some time to find or switch the folder to save and store the files.

Automatic Save Folder is a Firefox add-on that able to automatically save the files to desired location based on the type or other filter sets which user defines during configuration.

In the filter section, you can add any number of filters to the download.

Automatic Save Folder has the option to filters as domain names, file extension type and regular expression to filter download.

Apart of that, you also can select a particular folder for downloads which are not listed in the filter. Automatic Save Folder is currently an experimental add-on, whereby you need to have an account to download, although it’s free.

The below is the some examples of setting the filter:

  1. Save all subtitle files to video folder - domain: all, filter:.srt and folder: your video folder.
  2. Save all the files from a particular website (let say upsosb.blogspot.com) to be saved in UPSOS blog folder - domain: upsosb.blogspot.com, filter: all and folder: your UPSOS folder.
  3. Save all .exe files from mozilla in a folder only - domain: mozilla.org, filter:.exe and folder: your Mozilla Folder.
  4. Save all same filename in a folder only - domain: all, files:*bbc*.srt and folder: your bbc folder.
  • Download :
Mozilla Firefox Add-on. (You need to Log-in to install this experimental add-on.)

Friday, December 26, 2008

Resume or Restart Windows Vista Indexing Service After Pausing

Windows Vista indexing service (Windows Search SearchIndexer.exe) is a process that scans and creates a database record of files and folders on the system in order to improve the speed of search operation.
When WSearch indexing is running, it will unavoidable has read and write access to hard disk, causing slowdown in computing performance.
Although Windows Vista indexing speed will automatically reduced due to heavy user activity, many people opt to pause or disable the indexing service temporarily.
One common option is pausing the indexing process by clicking on “Pause” button in “Indexing Options” dialog window.
When pausing, the status for indexing service is “Indexing is paused”, with “Pause” button disabled or grayed out.
However, there is no unpause, resume or continue button to restart or resume the indexing process. In order to resume indexing from pausing, the workaround is to either restart the computer , or restart the Windows Search (WSearch) service.
To restart the Windows Server (SearchIndexer.exe) that performs that indexing job, go to “Control Panel” -> “Administrative Tools” -> “Services”. Locate “Windows Search” and click on “Restart Service” button.

Thursday, December 25, 2008

Disable and Turn Off Windows XP Login Screen and Show Traditional NT Log On to Windows Box

When Windows XP boots up in multiple users system, by default on startup, Windows XP will display a graphical logon screen with user icons and user names. In this “Welcome Screen”, user can click on his or her username or icon, type in the password (if assigned) and then log on to Windows XP desktop. Some XP may find the Welcome Screen is a beautiful user interface and convenient feature to quickly log in to Windows XP without tying additional long user name.

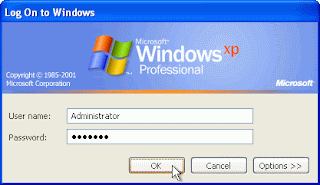
However, at times, Windows XP users may need to use the more traditional and standard “Log on To Windows” dialog box inherited from Windows NT login screen that allows users to key in user name and password. For example, when want to log on to hidden user account such as Administrator account.

To immediately access and open Log On to Windows traditional and standard login dialog box while on XP Welcome Screen, user can press Ctrl-Alt-Del key sequence twice (same with key sequence for reboot or secure login in NT based Windows). After pressing Ctrl-Alt-Del keys simultaneously twice, Welcome Screen will be changed to logon dialog box with user name and password fields.

To permanently switch to “Log On to Windows” NT styled logon dialog box so that users log on to the computer
without using the Welcome screen, instead of using the graphical Welcome login screen, follow these steps :

  1. Log on to Windows XP as Administrator or user with administrative privileges.
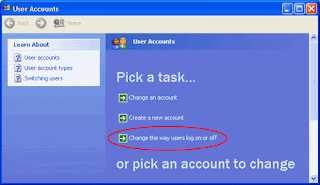
  2. Open User Accounts in Control Panel by clicking Start, click Control Panel, and then click User Accounts.
  3. Click Change the way users log on or off.


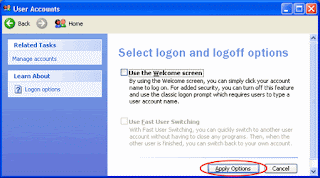
4. Clear the Use the Welcome screen check box.


  1. Click Apply Options button.

Note that by turning off and disabing Welcome screen, Fast User Switching feature is no longer available. To revert and switch back to use Welcome screen in XP, simply tick again the “Use the Welcome Screen” check box so that it is checked.

Wednesday, December 24, 2008

How to Encrypt and Protect Privacy Data Stored in Text Files


Are you the one like to use notepad to keep all confidential data such as user id, password, bank account number, credit card number and etc?

If yes, then you are at risk of giving chance to other people or even hackers to steal your personal data.

How do you ensure the data kept in the text file is really secured?

Now, there is a utility, named as Steganos LockNote that is able to encrypt the text file so that your sensitive data is protected from being accessed or stolen by anyone.


Steganos LockNote is free a utility and is able to encrypt your valuable data by using a password and the most advance AES 256bit encryption technology.
To use this utility, no installation is required, just run the executable file and you will see a notepad-like interface.
Type your data here and once you have saved the file, it will prompt you to enter password to encrypt the file.

Another impressive feature is that, if you have any existing text file and would like to encrypt it by using this utility, it doesn’t require you to copy and paste the contents to LockNote interface and save it to another file name.
Instead, what you need to do is just drag the text file and drop it to LockNote interface, then it will detect and ask your permission to convert this file. It is pretty easy and fast to convert any existing text files.
Once the file is encrypted, you will notice that the file is ended with exe extension.
To view or edit the content, just double click the file and it will prompt you to enter password to decrypt the file, enter the password and you will be able to view or edit the file as usual.

Steganos LockNote version 1.0.4 is a tiny utility which consumes only 312 KB.
It is compatible to run with Windows 2000, XP and Vista.
Since it is an executable file and no installation is required, you can copy it to thumb drive and bring it anywhere as you need.

  • Download :
Rapidshare - UPSOS Google Site Mirror.

Monday, December 22, 2008

How to Prevent Windows Shut Down Automatically With "ShutDownGuard"

Normally installing or upgrading software requires windows to be rebooted in order for it to take effect.

You may able to delay the reboot so that it will not prompt you immediately but some may not gives you the option and it will force you to reboot your windows within a minutes.
If you are in the middle of downloading huge files or with a lot of applications being opened, you may need to re-download all over again and worst thing is you may potentially lost the unsaved data.

This could be very frustrating and irritating as you need to go through the hassle to redo all over again, not to mention about unrecovery of important data.

With ShutDownGuard installed, it can prevent windows from being auto rebooted and let you decide when to shut down your windows at your convenience time.

ShutDownGuard is freeware and it runs silently in background.

Once the software upgrade has been completed and need you to reboot windows within a minute, it will be able to flexibly adjust and prevent windows from auto rebooting without any user intervention.
You will see a notification pop up at system tray to inform you there is an attempt to reboot the windows. If you are not ready to reboot the windows by now, just ignore the notification and only reboot windows later at your convenience time.
Otherwise, click on the notification to reboot the windows now.

ShutDownGuard version 0.2 only consume 70kB of your hard disk space, it is compatible to run with windows XP and Vista.

Download and install it now so that you can have full control over your computer from auto rebooting after software upgrade
  • Download :
Rapidshare - Mirror.

How to Merge Outlook and Gmail Contact

Most of your business contacts are probably stored in your company’s computer using Microsoft Outlook.

You might want to copy or move these valuable contacts to your Gmail account so that you can access them when you are away from the office or if you are planning to leave the company.

To move your Microsoft Outlook contact list to Gmail or vice versa is not that complicated.

A few steps away and you can get the work done:

Copy contact list from Microsoft Outlook (2003 or 2007) to Gmail Account:

1. Go to your Microsoft Outlook, open File>Import and Export;

2. Select “Export to a file” and click “Next”;

3. Choose “Comma-separated values (Windows)” and click “Next”;

4. Locate your contact list and click “Next”;

5. Assign a name to the file and save it. The file will be saved in .csv extension.

6. Now log in to your Gmail;

7. Click the “Contacts” on the left pane and subsequently select “Import” at the top right corner;

8. Click browse to locate the .csv file that you saved earlier;

9. You can click “Import” to start importing your contact. Of course you can add these imported contacts to a new group and you can name the group as well;

10. Once the importing process is completed, you will be indicated with the number of contacts added, merged or ignored if there were duplicates.

Copy contact list from Gmail Account to Microsoft Outlook (2003 or 2007):

1. Go to Gmail contact page, click to the “Export” at the top right corner;

2. Choose the list of contact that you want to export. Check the item “Outlook’s CSV format (for importing into Outlook or other application);

3. Click the “Export” but

ton. The exported file will be named as “contact.csv” automatically. Click the “Save” button to save the file;

4. Now go back to your Outlook. Go to File>Import and Export>Import from another program or file. Click “Next” to proceed;

5. Choose “Comma-separated values (Windows)” and click “Next”;

6. Browse for the file created from Gmail. At the prompted Windows, you will be given options to deal with the duplicate entries. You can allow duplicates, replace duplicates , or do not import duplicates;

7. Click “Next” to proceed. Choose the destination folder, e.g. Contacts under Personal Folders for your account, verify the action, and click Finish to complete the whole exercise.

Sunday, December 21, 2008

Google Doodle For 2008 Holidays !


As you can see, on the Home Page of Google,
a new logo for 2008 holidays !

This is the first one, and we are waiting for others.

Check the blog aging to see other logos !

Thursday, December 18, 2008

Get A New Browser, Get Google Chrome 1.0.154.36

A new web browser has been released by google, it is Google Chrome.
Google Chrome is a browser that combines a minimal design with sophisticated technology to make the web faster, safer, and easier.

  • Features :
You can explore this new features by viewing this video :


1-
One box for everything : Web search. Web history. Address bar. Suggestions as you type. One unified box serves all your browsing needs.

2- New Tab page : Every time you open a new tab, you'll see a visual sampling of your most visited sites, most used search engines, and recently bookmarked pages and closed tabs.

3- Application shortcuts : Use web apps without opening your browser. Application shortcuts can directly load your favorite online apps.

4- Dynamic tabs : You can drag tabs out of the browser to create new windows, gather multiple tabs into one window or arrange your tabs however you wish -- quickly and easily.

5- Crash control : Every tab you're using is run independently in the browser, so if one app crashes it won't take anything else down.

6- Incognito mode : Don't want pages you visit to show up in your web history? Choose incognito mode for private browsing.

7- Safe browsing : Google Chrome warns you if you're about to visit a suspected phishing, malware or otherwise unsafe website.

8- Instant bookmarks : Want to bookmark a web page? Just click the star icon at the left edge of the address bar and you're done.

9- Importing settings : When you switch to Google Chrome, you can pick up where you left off with all the bookmarks and passwords from your existing browser.

10- Simpler downloads : No intrusive download manager; you see your download's status at the bottom of your current window.

See this video that show : 10 Features of Google Chrome :


Source : Google Team.

  • Screen Shots :
Check the screen shots to get a global idea about Google Chrome :


1- Main window :


2- About window :


3- Bookmark manager :


4- Control the page :


5- Incognito window :


6- Options and Settings :


7- Task manager :


  • Download :
To get Google Chrome, just go to this page and click :

Download Google Chrome
: http://www.google.com/chrome

Enjoy the new browser !

Wednesday, December 17, 2008

Ela-Salaty The Best Software That Remember Times Of Prayer

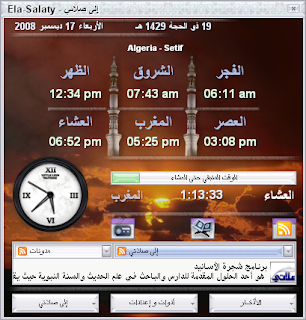
Ela-Salaty is a new Arabic program helps you to remember times of prayer.

Also helps you to mention of Allah and has many other advantages.

The new on this freeware that it has a modern beautiful interface, Grapping advices and news from Internet by using RSS technology, support skins, downloadable Azan audios, control windows by add system commands before and after Azan.

Ela-Salaty is quite different from any program of the same category.

The last Version is 1.3, and it includes unspecified updates, enhancements, and bug fixes.
  • Features :
- Easy to use.
- Times Of Prayer for 252 country and 9511 city.
- News Bar with RSS Technology.
- Online Radio with many stations.
- Auto-Update feature via Internet.
- Azkars.
- Auto Background Changing every time.
- Skins.
- Downloadable Azan audios.
  • Download :
1- Special Version 1.03 ( With Quran-Flash) : "28.9 MB"

Ela-Salaty Server. (Recommended)
Rapidshare Mirror.

2- Version 1.02 ( Without Quran-Flash ) : "7.36 MB"

Ela-Salaty Server. (Recommended)
Rapidshare Mirror.


We recommend to use the Special Version.
Post your comments and what to you think about this freeware !
  • Screen Shots :


Tuesday, December 16, 2008

Protect Your Computer From USB Drive Virus Infection Using "USB FireWall"

From MDL :

When USB drive is inserted into USB port, some programs may auto run without any notification and this has created the chance for viruses and other willful programs to be spread in your system.

How to ensure all auto run programs are free from malicious programs?

Now there is an application name as USB FireWall which is able to protect your PC from infected by any auto run programs as soon as USB device is inserted to USB port.

USB FireWall is an application that runs in background and is able to block all viruses and willful programs which try to spread in your system as soon as USB device is inserted.

When it detects any suspicious program, it will pop up a window with Delete and Cancel button.

If you choose Delete, it will remove all infected files and associated autorun.inf almost immediately.

If you choose Cancel, no action will be taken and the infected files will still remain in your USB peripheral. Besides auto detecting potential infected files from USB device, it is also able to detect the presence of any malicious programs from local drive by stopping them from launching.

Nevertheless, its functionality is limited when comes to certain extend, an Anti-virus software is more appropriate in dealing with such situation.


USB FireWall "Version 1.1.3" is a freeware and is compatible with both Windows XP and Windows Vista. Consume around 1.2 Mb of your hard disk space, it is worth to install to protect your computer systems from being attacked by virus in USB device.

  • Download :
Rapidshare - Mirror.

Monday, December 15, 2008

Quick On/Off Windows Sounds With SoundOff

Windows’ alerting beeps can be very irritating and grating to the ears especially when you are focused on something on screen, e.g. reading a financial report, writing a memo, watching a movie or teleconferencing with associates.

The sounds serve to alert users to incoming mail or other Windows action but can momentarily distract users from their purpose.

To turn off those sounds, you need to go to the control panel and change the setting at the Sounds and Multimedia applet.
An easier solution is to use a tiny application called SoundOff.

Approximately 1 Mb, SoundOff is a free application which is designed to toggle Windows sounds effectively. Once installed, the SoundOff icon will be added to the quick launch bar.
Users can easily turn On/Off Windows sounds with a single click.
Besides the easy On/Off feature, SoundOff also allows users to rename and delete the added sound schemes. It also has an option to make sure users’ current sound scheme stays that way, as some other programs will change the sound scheme without informing users.

  • Download SoundOff :
Rapidshare - UPSOS Google Site Mirror.

The down side of this application is it runs in the background when you start your computer and consumes the computer’s memory and resources.

How to Protect Your Gmail Account From Hackers

It is very common to hear about online security vulnerability with email and domains being stolen by unauthorized third parties.

As a frequent Internet surfer, how are you going to ensure your Gmail is safe from being attacked by hackers and prevent your private information from being stolen by third parties?

You never know or suspect the email is actually sent by hacker as the web page looks like a legitimate site you have visited before.

Hackers can imitate as banks, email, online merchants, payment services providers and even governments that you may be confused with what they have claimed and follow the instructions to enter your username, password and other private information on the site.

All these information can be used by hackers to steal your bank money, open new credit card applications under your name and etc.

In order to prevent or minimize such incident from happening, there are few tips you can apply to prevent hackers’ attacks:

Examine if there are any suspicious filters which are not created by you :
Access to your Gmail account, go to Setting -> Filters, then verify if there are any filters which are not created by you. Delete them right away if there is any.

Disable Forwarding and POP/IMAP :
Access to your Gmail account, go to Setting -> Forwarding and POP/IMAP, disable forwarding, POP and IMAP if you have not used them.

Be alert when being asked for sensitive information :
Any email or link in the email asking about your user name, password, bank account number or other personal information need to be cautious before submitting those information. Bear in mind that most of the legitimate websites never ask for sensitive information through this channel.

Do not click on suspicious links in email :
If you receive an email asking for private information from a organization which you know of, instead of clicking on the link directly from the email, go to the organization website directly by typing the address in URL. If there is something you need to do, usually there will be an announcement on the homepage. If you can’t find any information from the homepage, don’t hesitate to call the respective party to find out more.

Use a browser that has a phishing filter :
Use the the latest versions of browsers such as Firefox 3.x, Internet Explorer 7, and Opera 9.x which have included phishing filters for safer web browsing experience without being interrupted by these kind of phishing activities.

Do not be deceived by “great offers” or fantastic advertisement :
Whenever you have received any online offers and requires you to enter private information, don’t be too excited and make sure that it is really safe or try to find more information.

We hope that this tips will help you to protect your Gmail.

Saturday, December 13, 2008

Save Ink and Reduce Printing Costs With Ecofont

How can you save ink and reduce printing costs? A Dutch company has designed a new font called Ecofont which promises to use 20% less ink while printing.

How much of a letter can be removed while maintaining readability?
After extensive testing with all kinds of shapes, the best results were achieved using small circles. After lots of late hours (and coffee) this resulted in a font that uses up to 20% less ink.


We tested Ecofont and here is what an enlarged version of the font looks like with all the spaces between. (An other test is in the top of the article).

When printed in regular font sizes (they recommend size 9-10), these holes are hardly noticable, but they save ink. The sans serif format also helps to save more ink. The Ecofont is based on the Vera Sans, an Open Source letter, and is available for both PC and MAC. Ecofonts works best for OpenOffice, AppleWorks and MS Office 2007.

  • Download Ecofont. Its all about saving the environment.
Rapidshare - Mirror 1 - Mirror 2.

Enjoy this useful font !

Friday, December 12, 2008

New feature : Geotagging with Blogger in Draft

A new Feature called Geatagging has been just added to the new post editor in Blogger in Draft.
With Geotagging, you can add a location to your each of your blog posts. Just as time stamps help readers find posts from a certain date or time, Geotags give your readers a way to browse posts near a specific location.

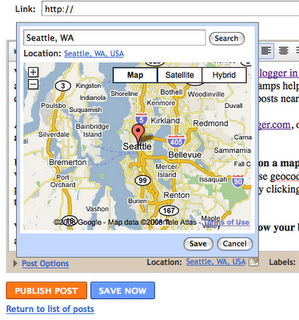
Adding a Geotag to your post is easy. Log into draft.blogger.com, open the post editor, and click the add location link below the main text field.

Use the location editor to search, drag, click and zoom on a map to choose and save a location. We’ll try to label the location you choose using our reverse geocoder, which looks up a name for a point on the map. You can also edit the location name by clicking the blue location name text below the search field.

When you publish your post, the Geotag is displayed below your blog post as a link, which will open up Google Maps.

Wednesday, December 10, 2008

Google : Countdown to the New Year 2009


2009 is coming, are you ready? With a couple of weeks away from the New Year, many people should be busy planning their New Year’s resolutions, e.g. planning behavioral changes, career improvement, etc. To thank users for their support and usher in the new year with fun, Google wants to invite its supporters to do the countdown to 2009 by presenting daily tip and trick on how to use its various services and products.

Get some tips and tricks from Google. Join Google’s “Countdown to 2009” and Google will add in daily advice for users. For instance, on the 4th, Google introduced you how to convert between many different units of measurement with its search engine and on the 5th Google tell you how to limit your search to values within a specific numeric range.

This digital way of celebrating the New Year is quite delightful. As the clock ticks away the final minutes of the old year, users will be able to get some know-how of Google’s services besides enjoying the fun of counting down.


Thank you for reading.

Tuesday, December 9, 2008

Get Windows Vista SP 2 Service Pack 2 (Beta)


From Microsoft Download Center :

Windows Server 2008/Windows Vista Service Pack 2 (SP2) Beta is an update to Windows Vista and Windows Server 2008. It provides customer and partner feedback driven fixes into a single service pack, minimizing deployment and testing complexity.

In addition to all previously released updates, SP2 will contain changes focused on addressing reliability and performance issues, supporting new types of hardware, and adding support for several emerging standards.

Windows Server 2008 SP2 Beta and Windows Vista Service Pack 2 Beta apply to people, organizations, and technical enthusiasts who are comfortable evaluating prerelease software. This prerelease software is provided for testing only. Installation of Service Pack 2 Beta will result in Microsoft collecting information about the installation process, even if the installation is not completed. We do not recommend installing this software on primary or mission-critical systems. We recommend that you have a backup of your data before you install any prerelease software.

SP2 is an update to Windows Server 2008 and Windows Vista that addresses feedback from our customers and partners. By providing these fixes integrated into a single service pack, Microsoft provides a single high-quality update that minimizes deployment and testing complexity for customers.
In addition to all previously released updates, SP2 will contain changes focused on addressing reliability and performance issues, supporting new kinds of hardware, and adding support for several emerging standards. SP2 will also continue to make it easier for IT administrators to deploy and manage large installations of Windows Server 2008.

Service Pack 1 is a prerequisite for installing Service Pack 2. Please make sure that your system is running Service Pack 1 before you install Service Pack 2.
Windows Server 2008 SP2 Beta and Windows Vista Service Pack 2 Beta - Five Language Standalone version can be installed on systems with any of the following language versions: English, French, German, Japanese, or Spanish.

From QTO :

Microsoft has released Windows Vista Service Pack 2 (SP2) Beta and Windows Server 2008 Service Pack 2 (SP2) Beta as an update to Windows Server and Windows Vista. Now testers can try the new software update to see the difference.

Microsoft has released these through a Customer Preview Program (CPP) launched on TechNet and is intended for technology enthusiasts, developers, and IT Pros. For most customers, they advise waiting for the final release. Remember Windows Server 2008 SP2 Beta and Windows Vista Service Pack 2 Beta is a prerelease software and provided for testing only. Microsoft will collect information about the installation process, even if the installation is not completed.

Download Windows Vista Service Pack 2 Beta now and see what goodies are in store. Since Service Pack 1 is a prerequisite for installing Service Pack 2, ensure your system is running Service Pack 1 before you install Service Pack 2. Download Windows Vista SP1 (which you should have got by now anyway) if you want to try SP2.

Windows Vista SP2 Beta fixes specific reliability, performance, and compatibility issues and has some new features like

* Adds Windows Search 4.0 for faster and relevant searches.
* Bluetooth 2.1 Feature Pack supporting recent Bluetooth Technology.
* Ability to record data on to Blu-Ray media natively.
* Adds Windows Connect Now (WCN) to simplify Wi-Fi Configuration.
* Enables exFAT file system to support UTC timestamps, which allows correct file synchronization across time zones.
  • Downloads :


Windows Vista Service Pack 2 Beta :


Rapidshare - Mirror - Free - Megaupload - Zshare (Uploading ...)

Windows Vista Service Pack 1 :

Rapidshare - Mirror - Free - Megaupload - Zshare (Uploading ...)

-------------------
Enjoy this Update.

Monday, December 8, 2008

Eid Adha Mubarak for ALL !


Today is Eid Al-Adha El Mubarak,

and on this important religious occasion,

the UPSOS Team congratulate the whole Islamic Nation.

Eid Mubarak.

Sunday, December 7, 2008

An Extreme Desktop On Ubuntu ! [Video]

Here is a video of Ubuntu 6.10 with XGL and Kiba-Dock :


Ubuntu is one of the best Linux distributions, you can get it for FREE.
For more informations, read this post :

Ubuntu : a Free Operating System (Download or request a CD)

Saturday, December 6, 2008

New Twitter account created ! You can Follow us now


Hello.
a New twitter account has been created,
so you can Follow us and get our updates using twitter.

The account is : http://twitter.com/upsos

A new gadget has been added to the blog to follow us directly over the blog !

New updates for twitter will be added soon.

We Get Into Google in Less Than 20 Minutes !

Hello and Welcome.

As you see, the previous post "Get "QuickPress" : a Cool WordPress Theme !" : got archived by Google in less than 20 minutes !

The secret is : Posting and Waiting ...

After you get a blog, just start posting, and remember to subscribe to : Google Webmasters Service. It is FREE and takes several minutes.
Also try to send a Sitemap to Google, follow this instructions :

1- You can use your Atom Feed as a Sitemap, the URL is :

http://upsosb.blogspot.com/atom.xml

Replace "upsosb" with your blog sub domain.

2- Do you know that Blogger generate a Sitemap for your blog ? the Sitemap URL is :

http://upsosb.blogspot.com/feeds/posts/default?orderby=updated
Replace "upsosb" with your blog sub domain.

3- Do you know that Blogger generate a Robots.txt for your blog ? the Robots.txt File is :

http://upsosb.blogspot.com/robots.txt
Replace "upsosb" with your blog sub domain.

You can use this tips to get into Google easily and rapidly. If we get other updates, we will post them on the blog ! Share your tips and experiments with us : Post them in comments.

Thank you and remember to Subscribe to our RSS feeds to get updates.


New Update :
See this image : this post get archived by Google in minutes :


Tip of the 48 week :  Shutdown you computer with one click !

Subscribe new posts by RSS feed or by Email

Official UPSOS Blog Feed

↑ Grab this