NEWS : The Weblog is BACK again with a new Team !

Choose your Language : English | Arabic | French | Italian | Russian | Spanish | German | Chinese

UPSOS Blog Feedback Survey :

Please complete this short survey to give us feedback on our blog :

http://spreadsheets.google.com/viewform?key=pHtdCqYlJfrHN3D6-lQHsbQ

Tuesday, March 29, 2011

How to Hide Applications From The Taskbar With WinVisible

Many users tend to do personal things while at work such as surfing internet, messaging with friends, playing games, etc. It may happen that colleagues and superiors suddenly walk by and they have to immediately close the program or minimize it. Some users probably even have to restart their computer or turn off their monitor to avoid being caught in an embarrassing situation. If you have ever experienced this, perhaps NCS’ WinVisible can give you an alternative solution.


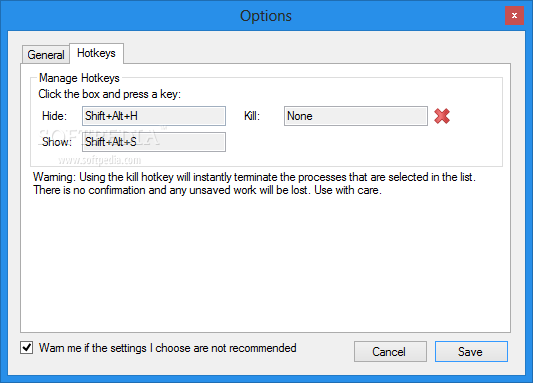
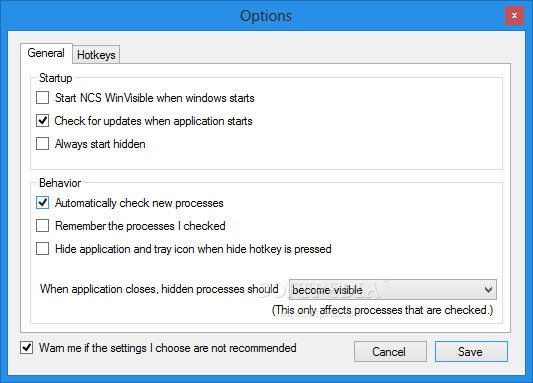
NCS WinVisible is an interesting and tiny application that can help users to hide running applications from the taskbar with their assigned hotkeys. With this privacy-protector application, users can configure the applications with special hotkeys and just press the hotkeys to hide the application immediately. To bring back the invisible application to the taskbar, users just need to press another set of separate hotkeys to call it back to the Windows taskbar or the system tray.
Besides hiding the running applications from being seen by others, WinVisible also offers another feature which terminates or kills the running applications immediately with certain assigned hotkeys. By pressing the hotkeys, the applications will be terminated immediately but the unsaved work will be lost. Hence users need to be cautious if they press these hotkeys.
WinVisible will be quite useful for users who want to keep their secret or do not intend to let other people know what they are doing.

Download the free WinVisible: winvis.zip

Saturday, March 26, 2011

Get CCleaner v3.05 the best Windows freeware system tuning tool

In an effort to support the latest version of browsers IE 9 and Firefox 4, Piriform has made improvements to its CCleaner with the version of CCleaner 3.05. CCleaner is one of the best Windows freeware system tuning tool which has been designed to optimize and speed up the Windows processing. The latest version of the CCleaner v3.05 has been improved registry cleaner to trim out old Firewall entries and added lot of third-party cleaning rules.   

 Those users who like to download the latest version of CCleaner v3.05, can download from the below official direct download link.

Download CCleaner v3.05: ccsetup305.exe

Thursday, December 16, 2010

How to Install Android 2.3 Gingerbread Keyboard on 2.2 Froyo


Android 2.3 (Gingerbeard) contains a new revised keyboard with a new look, which supposedly to be easier to use and improve typing speed on the Android mobile smartphone devices.

Most Android devices on the market right now is running on either Android OS 2.1 or Android OS 2.2 (Froyo). If you own a Android machine which running (or upgraded to) Android 2.2 operating system, try the following hack to port and install Android 2.3 Gingerbread keyboard interface onto any Android device running Android Froyo 2.2 operating system.

Note: The Android device must be rooted prior to installing the new layout on-screen keyboard.


1. Important: Create a backup of the phone, including LatinIME.apk from /system/app folder.
2. Download the hack files: GingerBreadLatinIME.zip.
3. Copy the file to the root folder of SD Card on the phone.
4. For Droid X and Droid 2 only, navigate to Clockwork -> Mounts and Storage -> Mount System.
5. Boot into recovery mode.
6. Install the .ZIP package.
7. Reboot the device.
8. Select “Android Keyboard” under Input Method to activate the new keyboard.

The hack is not perfect though. Some functionality is missing, such as auto-complete. In addition, some Droid X (DX) users are reportedly been shown a miniature version of keyboard, which is practically useless.

Download : GingerBreadLatinIME.zip

Saturday, November 27, 2010

How-To Use "Find My iPhone App" in iOS 4.2 iPhone, iPod Touch & iPad

The Find My iPhone utility, which previously is only available to MobileMe paid subscribers, has been made available to public. And if you wonder how to install it for use, below are some simple guide that can you can follow to make it work.

Update the iPhone, iPod Touch or iPad to iOS 4.2 as a pre-requisite.
Then, install the Find My iPhone app into your iPhone.
On the iPhone menu, go to Settings -> Mail, Contacts, Calendar -> Add Account -> MobileMe.
Enter the valid Apple ID and password (the one that you used for iTunes).
Or if you are MobileMe user, enter your me.com or mac.com email address and password.

Confirm the verification process by clicking on link in email and sign in the app using your Apple ID.
Browse to Setting -> Mail, Contacts, Calendars -> MobileMe and toggle the Find My iPhone button to ON, followed by ‘Allow’ button tap.


By now, whenever you lose your iPhone, just sign into MobileMe to track its location on the map with extra remote capability to enables control to either play a sound or display a message, or delete private sensitive data permanently. Currently the Find My iPhone app is free for download in App Store and is compatible to be used on iPhone 4, the 4th generation iPod touch and iPad.

Screenshots : 


App Info : Free
Category: Utilities
Updated: Nov 22, 2010
Current Version: 1.1
Size: 5.4 MB

Download : iTunes.

UPSOS is back !

We are happy to announce that UPSOS weblog is back to life again !
So say tuned for the next posts. Wana send feedback ? feel free to contact us !
 > Follow us on Twitter @upsos

Saturday, March 21, 2009

Blog Closed For Maintenance

The Blog is Now Closed For Maintenance

Please Subscribe to the RSS Feed or by Email to Get the Last Updates about UPSOS

Subscribe

Thursday, January 1, 2009

Get "QuickPic", a Wordpress Theme For Photobloggers

QuickPic is a 1-column, widget-ready, SEO-optimized, Ad-ready, compatible wordpress theme which is very useful for all types of bloggers, in particular for photobloggers.

Its for free use and with free lifetime support.


Download : (v1.0)


  • Why use QuickPic Wordpress Theme ?

1-Column - one column templates help to keep the theme crisp and simple, while fitting your makor content.

This is particularly useful for photoblogging where your images and videos get the most focus and naviagtion is fitted at the bottom.

Flickr Size Compatible - The width is particularly kept at 500px to easily fit in images from Flickr which provides code to embed images of this very size.

3-Column Footer - All your widgets and sidebars are neatly fitted into the footer.

You can easily display your latest posts and comments, categories and other outputs.

Widget Ready - Two widget ready sidebars are ready to be loaded with widgets. Simply go to Presentation>Widgets and load up you favorite widgets right into the sidebar.

The current theme displays the Recent Articles RSS feed and Recent Comments widgets in 2 widget sidebars.

Fast Loading - Minimal clean code ensure the theme is fast loading as much as possible. Load up some default widgets, which are cached automatically and you still have a quick loading site.

SEO optimized - Theme has be designed make it as search engine friendly as possible to help you get more site traffic and higher search engine ranking for your articles.

Ad Ready - The template files have commented areas where you can easily add your advertisements and easily customise the template.

Gravatar ready - Choose gravatar dispay options from WP Admin.

Valid XHTML and CSS - The theme has been thoroughly checked for XHTML and CSS validity and its ready to go with any browser and platform.

Spam Free - the template has been checked to be free of any hidden links and bug codes.

Plugin Compatible - Tested and retested to support most plugins.

Browser Compatible - Tested on latest versions with IE, Firefox, Opera, Safari for compatibility and design issues.

Top navigation - Your own set of links, ads highlighted at the top of the page.

Free Lifetime Support - ask your queries and get them answered for free. We help you use and optimize QuickPress for as long as you use it.

FREE - like all Wordpress goodness, released under a GPL License.

  • FAQ :
I do not need to show Blogroll or About?

Simply remove the particular code from the footer.php.

Can I remove your attribution link?
You are required to keep the attribution “QuickPic theme by Quick Online Tips” in the footer as it is for credits to the theme designer.

Can I edit the template to suit my needs?
You can edit the css file to blend your content and suit your requirements.

Can I change the link colors?
Sure. see the “a” tags in style.css
Wednesday, December 31, 2008

How To Restore Firefox’s Lost Bookmarks

Did this ever happen to you that you opened Firefox and you found out that all your bookmarks are gone.

Well this sometimes happens when your Firefox is not closed properly and mostly due to that you lose all your bookmarks.

But many people don't know that Firefox make backup of your bookmarks everyday and there are some simple ways to restore the lost bookmarks in Firefox.

f this happened with you as well then don't worry because after the following steps, hopefully you will get all your bookmarks back.

The first thing your should do is locate your Firefox’s profile folder which is usually in :

C:\Documents and Settings\[USER-NAME]\Application Data\Mozilla\Firefox\Profiles\


Or if your cant find it, simply go to Start > Run and type the following command and it will take you to the Firefox profile folder

%APPDATA%\Mozilla\Firefox\Profiles\


Find this first and then in this folder, there will be a folder of bookmarkbackups as shown in the picture below :


Just Open the BookmarksBackup folder and there you will see many html files with dates given in there name as shown below :


There you go you found all of your bookmarks that were made by Firefox automatically.

Now Just copy the file you want to. What i mean is copy the latest file by checking the date and paste it somewhere or just paste in your desktop so that it is easy to locate when you want to restore the bookmarks you lost.

Now This is an easy task i-e restoring the backup.

Just Open your Firefox and go to Bookmarks> Organize Bookmarks.

A new window of bookmarks open and then go to File > Import > check From File


Locate the bookmarks file from the location where you pasted the file and Click Ok.

And hopefully all your bookmarks will be back.

We hope that this tip helps you !


Tip of the 48 week :  Shutdown you computer with one click !

Subscribe new posts by RSS feed or by Email

Official UPSOS Blog Feed

↑ Grab this